Thursday 25 June 2015

Ta Daaa!!

Here is the completed rim, a nice Ta Daaa picture opportunity. Hubby eventually managed to take a picture I was happy (ish) to post.


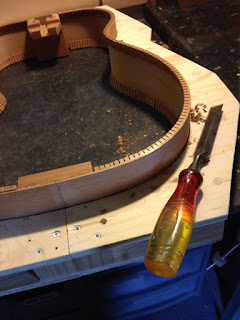
The curved sides were reinforced with small mahogany braces, the invaluable clothes peg making another appearance.


The neck block will be visible from the soundhole on the completed instrument so I sign it with a pyrography (wood burning) tool. I've been using this logo for various things since I was a teenager.


Then I moved onto joining the back of the guitar and cutting up some old furniture retrieved from the fire wood pile to make a Go-Bar press. This is basically two flat surfaces that you can brace timbers between to act as clamps. In my case I use a wide fixed desk and the floor beneath it. My, still shiny and new, bandsaw made it possible to cut strips of wood approximately 1/2 inch square.


Here is the back strip being glued in place in the Go-Bar press. As you can see you would need some very long reach clamps to do this any other way. The most important part of this procedure is remembering to shut the office door while it dries...


"No Jessie, that is NOT YOUR STICK!"
◤◡ᴥ◡◥


Monday 15 June 2015

Sunshine and Inlay Designs

It's always a good moment when the sun comes out and GBG can move the workmate into the garden. Mmmmmm... Jessie's enjoying it too.


I've finished gluing the kerfling and nearly finished the process of chiseling it back to flush with the edge of the rim.


I have also finalised the inlay design for the headstock with M (the customer). He initially told me he wanted a fox design so with some trepidation I began researching inlay materials that come in a fox-red colour. I found some very interesting reconstituted rock inlay material from this site: Small Wonder Music After looking through the options M chose the green banded malachite!? I was somewhat surprised but having put together a digital mock-up of the design I think it works very well. 


Groovy!   (⌐■_■)


Saturday 6 June 2015

Jigs and Rims

Some good progress this week in the GBG workshop. I've completed the jig to hold the curved sides whilst construction is underway.


I've also cut the pre-curved sides to length and fitted the end and top blocks to join them together. 


It's beginning to dawn on me that a workshop can never have too many clamps. Some of these were borrowed from hubby's engineering workshop. I will build up my own collection in time. Especially as clamps borrowed from a metal working workshop need considerable cleaning up before they can be used anywhere near wood.


Here is the rim in the jig ready for the kerfling to be fitted. The kerfling gives the top and back something to adhere to that is thicker than the 2mm sides.


There are specialist clamps available for this process but (despite my earlier comments about clamps) the common clothes peg works just as well.

The next tasks are to complete fixing the kerfling (blogger has come up with some very funny alternatives for the word 'kerfling' which apparently doesn't exist) then onto designing the new sound hole rosette. 

Tune in soon for the next thrilling instalment! ;)